Invoice a Customer and Track Payment
On this page you'll raise an invoice — who's billed, the line items, taxes and discounts, and when payment is due — then track it as it moves from draft to open to paid.
Entry pointFinance → Payments
Invoices live on the Invoice tab.
| Article summary | Details |
|---|---|
| Best for | Managers and admins who bill customers |
| Main outcome | A saved invoice with the right customer, items, and status |
| Roles | Manager, admin, finance owner |
| Requires | Permission to create invoices; a billing customer and line items |
| Related reports | Billing and paid-versus-outstanding reporting |
Before You Start
- Decide the customer type: Contact, Developer, Partner, or Company. You can also use + Add to add a new one.
- Have the billing address, currency, issue date, and due date ready.
- Prepare the line items (item, description, quantity, amount) and any tax rate or discount.
Review the Invoice List
The Invoice tab lists existing invoices with these columns:
| Column | Shows |
|---|---|
| Invoice Number | The invoice reference, such as INV-000004 |
| Customer | Who is billed |
| Amount | The invoice total |
| Status | Open, Paid, Void, or Draft |
| Invoice Date / Modified At | When it was issued and last changed |
| Actions | Open the row menu to manage the invoice |
Use Search deals to find an invoice by its deal, and Filter to narrow the list.
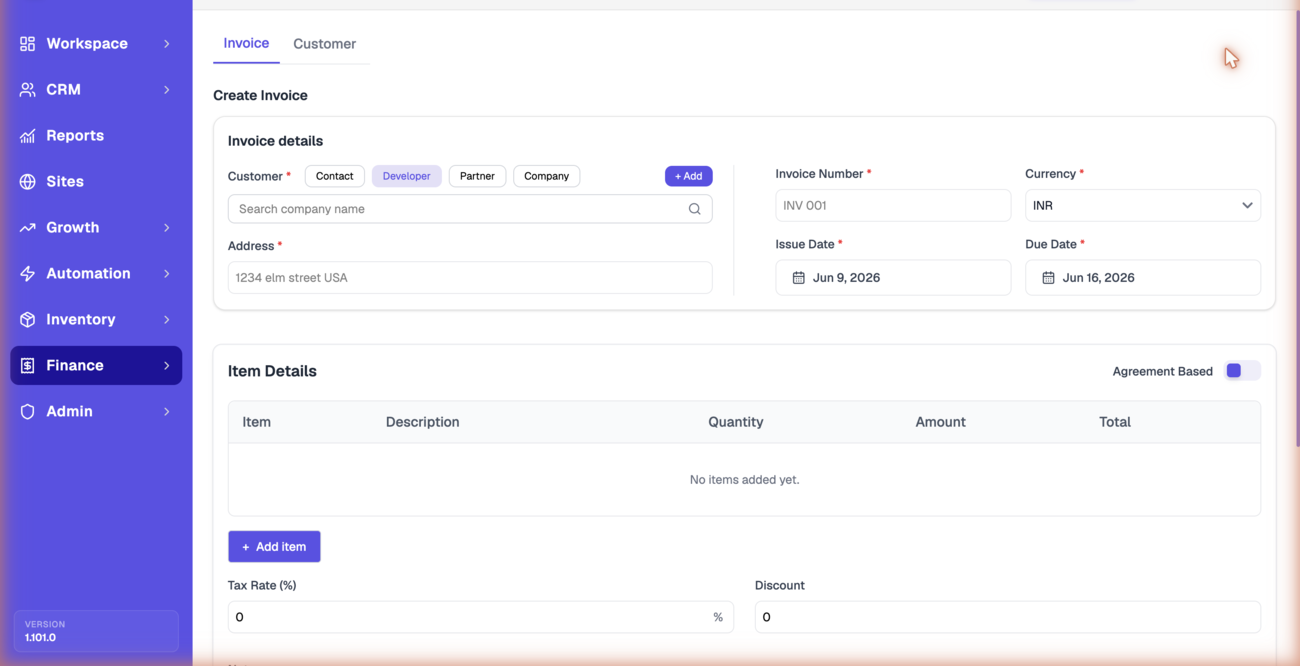
Create an Invoice
- Open Finance → Payments and select Create Invoice.
- Under Invoice details, choose the customer type (Contact, Developer, Partner, or Company) and search for the customer. Confirm the Address.
- Enter the Invoice Number, choose the Currency, and set the Issue Date and Due Date.
- Under Item Details, select + Add item and enter each item's description, quantity, and amount. Turn on Agreement Based if the invoice follows an agreement.
- Set the Tax Rate (%) and any Discount.
- Edit the Notes shown to the customer if needed.
- Optionally turn on Add Payment Method to include payment details.
- Select Save.
The totals update from your line items, tax rate, and discount, so confirm those before saving. A new invoice starts as a Draft until it is issued.
Check the Result
After saving, you should see:
- The invoice in the Invoice list with its number and amount.
- The correct Status (for example, Draft or Open).
- The right customer and dates.
Common Issues
| Issue | What to check |
|---|---|
| Cannot save the invoice | Complete the required customer, address, number, currency, and dates |
| Total looks wrong | Recheck line items, tax rate, and discount |
| Customer is not selectable | Add them on the Customer tab first |
| Status does not change | Reopen the row actions; confirm your role can update invoices |
If Create Invoice or the row actions are hidden for you, ask your admin — both depend on your permissions, and invoice editing is often limited to finance roles on purpose.
Contact Brixi support if an invoice saves but doesn't appear in the list, or its status won't change from the row actions. Include the invoice number, the customer, what you expected, and a screenshot.
Reporting Impact
Invoice amounts and statuses drive billing reporting. Keeping each invoice on the correct status — Draft, Open, Paid, or Void — keeps revenue and outstanding balances accurate.