Capture a New Lead
Every lead that lands with the right details from the start is a lead your team can actually work — no missing phone number, no guessing where it came from. This article covers both halves of that job:
- Capture a brand-new lead so it's ready to work.
- Keep it current — phone, email, status, gender, location, date of birth, lead type, priority, tags, custom fields, notes, and more — as the relationship moves.
Entry pointCRM → Contacts
All updates happen on the contact detail page. Open a contact to follow along.
| Article summary | Details |
|---|---|
| Requires | Permission to create or edit contacts. |
| Where to go | CRM → Contacts → + Add Contact (to add), or open a contact (to update). |
Add a Contact
- In the left menu, select CRM, then Contacts.
- Select + Add Contact in the top-right corner. The Add Contact form opens.
- Enter the customer's Name.
- In Phone Number, keep or change the country code, then type the number. The country code defaults to +91.
- Open Type and choose one: Buyer, Investor, Seller, Tenant, or Landlord.
- Enter the customer's Email.
- Open Source and choose where the lead came from (see the field reference for the full list).
- (Optional) Open Owner and assign the user responsible for the contact. If you leave this empty, the contact stays unassigned.
- Select Add Contact to save.
The new contact appears in the Contacts list with its source and status.
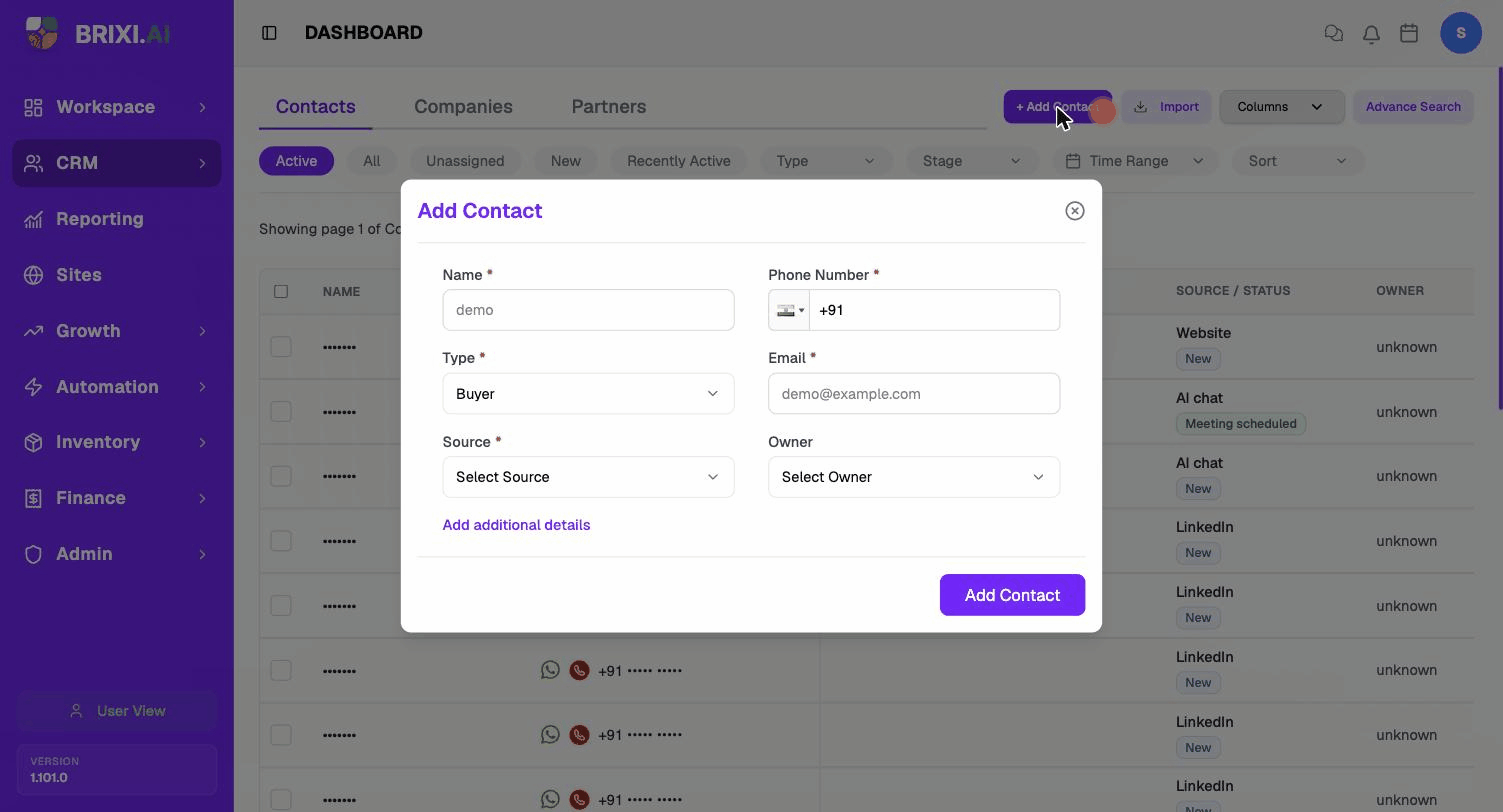
The form will not save until each of these fields is filled.
Field Reference
| Field | Required | What to enter |
|---|---|---|
| Name | Yes | The customer's name. |
| Phone Number | Yes | Country code plus number. Defaults to +91. |
| Type | Yes | Buyer, Investor, Seller, Tenant, or Landlord. |
| Yes | The customer's email address. | |
| Source | Yes | Where the lead came from (list below). |
| Owner | No | The user responsible for the contact. |
Source options, exactly as shown in the form:
Facebook, LinkedIn, Housing, Google Ad, Website, Form, Instagram AD, Direct, Walk In, Referral, Partner, Other, 99acres, Justdial, Sulekha, Magic Bricks.
Set Source to where the lead actually originated, not how you entered it. A walk-in customer you type in by hand is still Walk In.
Add Extra Details
The contact form can also store company and requirement details.
- In the Add Contact form, select Add additional details.
- Fill any of the optional fields:
- Company — search and link an existing company.
- Interested In — what the customer is asking about (for example, a product or project name).
- Designation — the customer's job title.
- Select Add Contact to save.
These fields are optional. You can add them now or update them later.
Open a Contact to Update It
- Open CRM → Contacts.
- Find the customer (see Search and Filter Contacts).
- Select the contact's name to open the contact detail page.
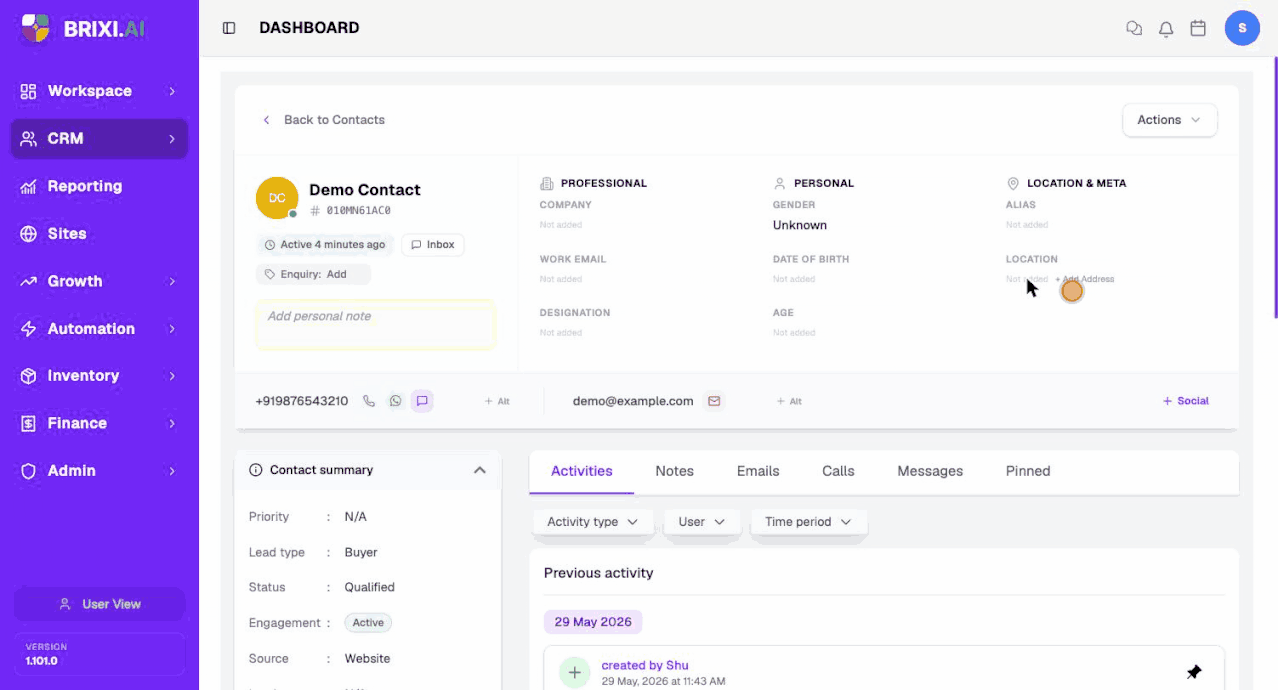
The detail page is where every update happens. The top of the page shows the header, profile fields (Professional, Personal, Location & Meta), and the contact's phone, email, and social channels.
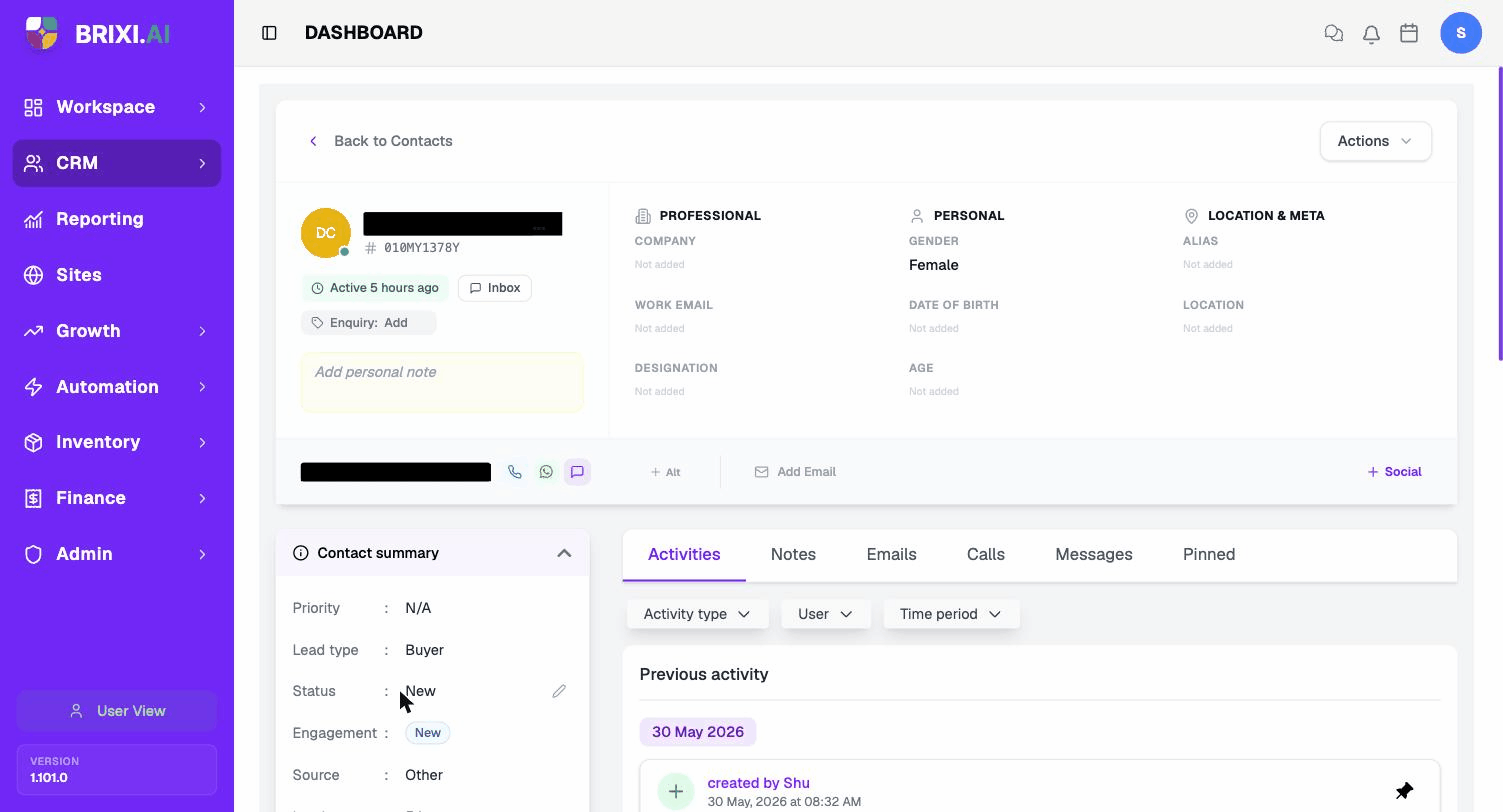
Scroll down and the Contact summary panel on the left lists the rest of the fields you can edit: Priority, Lead type, Status, Engagement, Source, Lead age, and Tags.
Always update the existing contact when the customer's details change. Don't create a second contact for the same person.
How Inline Edits Work
Most profile and summary fields use the same pattern:
- Hover the field. A small pencil (edit) icon appears next to the value.
- Click the pencil. An inline editor or a small dialog opens.
- Make the change.
- Click Save (or press Enter).
Fields that show Not added are empty — click the value to add one. The rest of this article walks through each individual update.
Add a Note
You can attach notes to a contact in two places:
- Personal note — the yellow Add personal note box in the header. Type a short note and it saves to this contact's record. Use it for quick reminders only you (or your team) need to see.
- Status note — when you change the status, the Update Status dialog has a Note field where you can record why the status changed.
For longer notes, calls, and emails, use the Activities tabs (Notes, Emails, Calls, Messages) under the contact summary, or Actions → Log Notes in the top-right. See Activities for details.
Edit the Phone Number
The main phone number is shown below the profile fields with call, WhatsApp, and chat shortcuts.
- Click the phone number to open the inline editor.
- Type the new number (keep or change the country code).
- Save.
To add a second number, click + Alt to the right of the phone row. The alternate number appears alongside the primary one.
Add or Edit the Email
To the right of the phone row, click Add Email (or click the existing email to edit it). Type the address and save. Use + Alt to add an alternate email.
Brixi keeps a separate Work Email in the Professional section. Update it the same way — click the value (or Not added) and type.
Update Gender
In the Personal section, hover Gender and click the value (for example, Female or Not added). Choose Male, Female, or Other from the dropdown and save.
Add or Update Date of Birth
In the Personal section, click Date of Birth (or its Not added placeholder). Pick the date from the picker and save. Brixi calculates Age automatically from the date you set.
Add or Update Location
The full address lives under Location & Meta:
- Under Location, select + Add Address (or click an existing address to edit it).
- Choose how to enter it: Google Map Link, Search, or Manual.
- Fill the address, city, and locality (these are required), plus optional postal code and coordinates.
- Tick Set as primary address if it should be the main one.
- Select Save Address.
Change the Lead Type
In the Contact summary panel, hover Lead type and click the value (default Buyer). Pick one of Buyer, Investor, Seller, Tenant, or Landlord and save.
Set the Priority
In the Contact summary panel, hover Priority and click the value (default N/A). Pick a priority level (for example Low / Medium / High) and save. Priority helps your team sort and filter contacts that need faster follow-up.
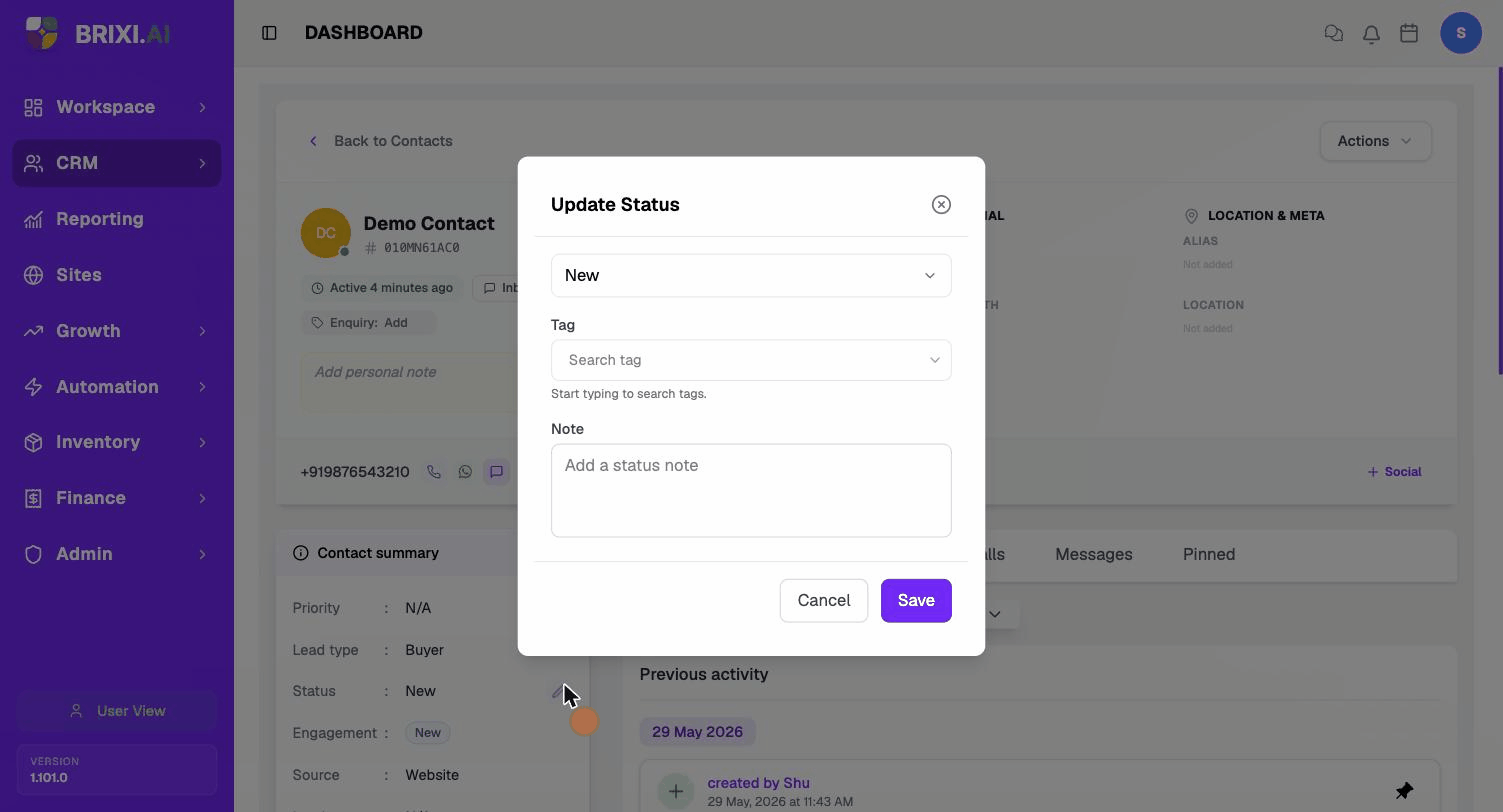
Change the Status
A contact's status shows where it stands in the lead pipeline. Update it as the customer moves from a new lead toward a closed outcome.
- In the Contact summary panel, hover Status and select the edit (pencil) icon. The Update Status dialog opens.
- Open the status dropdown and choose the new status.
- (Optional) Add a Tag by searching for one.
- (Optional) Add a Note describing the change.
- Select Save.
Status Options
| Status | Typical meaning |
|---|---|
| New | A fresh lead, not yet worked. |
| Qualified | The lead is a genuine prospect. |
| In Process | Active work is underway. |
| Meeting scheduled | A meeting is booked. |
| Meeting done | The meeting has happened. |
| Proposal | A proposal has been shared. |
| Negotiation | Terms are being discussed. |
| Disqualified | The lead is not a fit. |
| Customer | The lead has converted. |
| Opportunity lost | The deal did not close. |
The status you set appears in the Source / Status column on the Contacts list and updates the contact's place in the pipeline.
Add or Remove a Tag
Tags help you group contacts (for example, VIP, Investor, Cold lead).
Add a tag
- From the Contact summary panel, scroll to Tags and click + Add Tags. Search for a tag or type a new one and save.
- Or open the Update Status dialog (above) and add the tag there at the same time as a status change.
Remove a tag
- In the Tags row, find the tag chip and click the × on it. The tag is removed from this contact only — the tag itself still exists for other contacts to use.
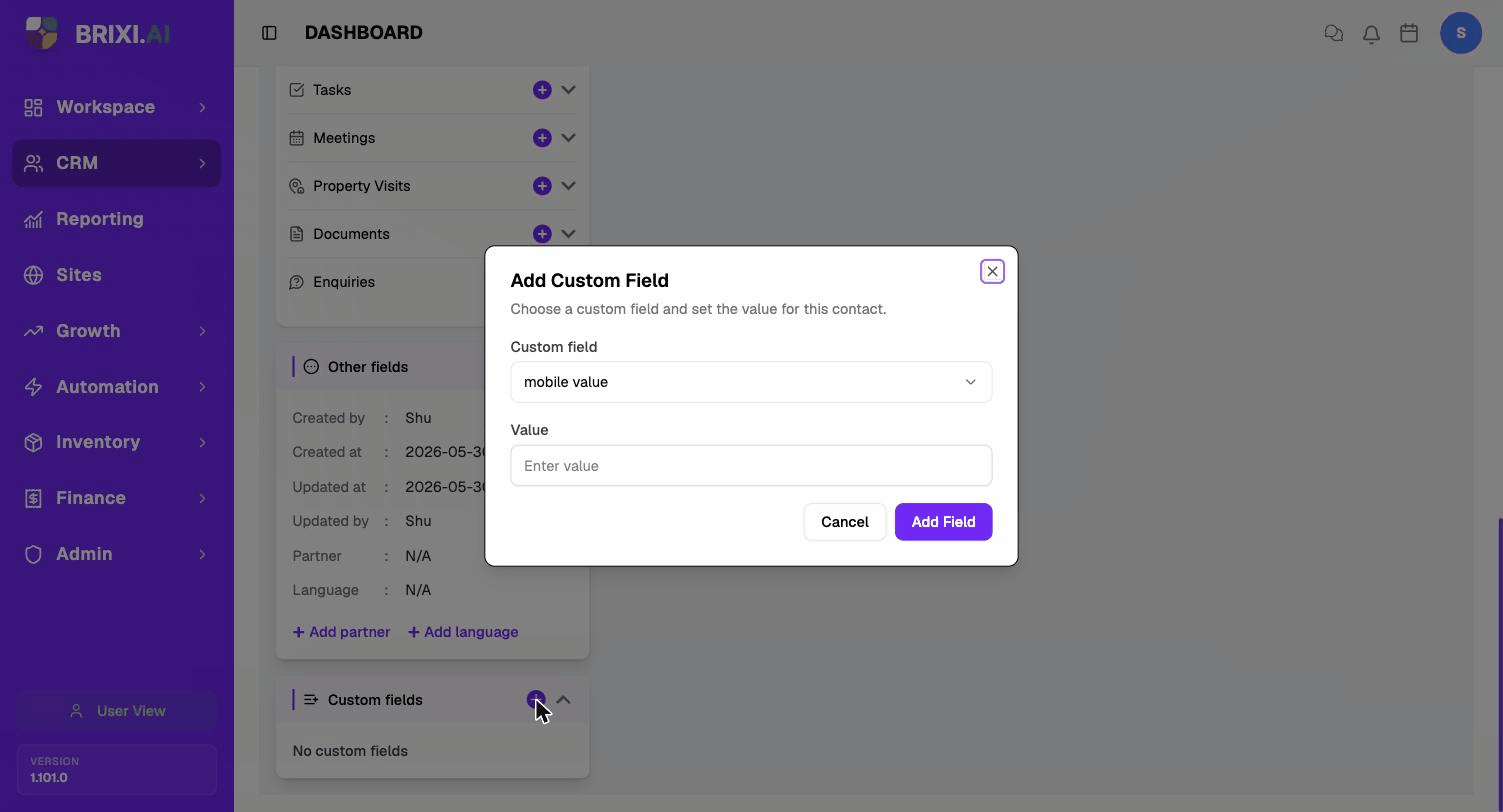
Add or Remove a Custom Field
Custom fields let your workspace store extra information beyond the built-in fields (for example, Loyalty tier, Preferred locality, Referral code). An admin defines the custom field list once; you fill it in per contact.
Add a custom field value
- Scroll to the Custom fields card at the bottom of the contact detail page.
- Select the + button in the card header. The Add Custom Field dialog opens.
- Open Custom field and pick the field you want to set.
- Enter the Value.
- Select Add Field.
Remove a custom field value
In the Custom fields card, find the field row and click the remove (×) control next to it. The field is cleared from this contact; the custom field definition itself stays available for other contacts.
If the Custom field dropdown is empty, an admin hasn't created any custom fields yet. Ask your admin to add the fields you need under workspace settings.
Troubleshooting
Two things on this page commonly turn out to be admin setup rather than bugs: an empty Custom field dropdown (no custom fields defined yet) and missing edit pencils on profile fields (your role can't edit contacts). Check with your admin first in both cases.
Contact Brixi support if the Add Contact form rejects a save with all five required fields filled, or an inline edit saves but the old value comes back after a refresh. Include the contact name and the field you were editing.