Capture and Reply to WhatsApp Leads
Capture inbound WhatsApp conversations as leads, reply from the Brixi Inbox, run WhatsApp campaigns, and let an AI agent handle first responses automatically — all from one connected WhatsApp Business number via the Meta Cloud API.
The setup is a 5-step wizard: Setup → Leads → Credentials → Webhook → Verify.
Entry pointAutomation → Integrations
Who Can Do This
Account admins only. WhatsApp connections affect inbound lead flow and message delivery for the entire account. Only admins can connect, edit, or remove WhatsApp numbers.
Sales users and agents can send and reply only after the number is connected, verified, and their role permits it.
What You Need Before Starting
Gather these before opening the setup wizard:
- A verified WhatsApp Business number registered in Meta Business Manager.
- Your Meta Cloud API credentials:
- Phone Number ID
- WhatsApp Business Account ID (WABA ID)
- Permanent Access Token (from Meta Developer Console)
- Admin access to your Meta App to configure webhook settings.
- A test contact with a valid phone number to verify the connection after setup.
What WhatsApp Enables
| Area | What you can do |
|---|---|
| Inbox | View and reply to WhatsApp conversations linked to contacts. |
| Contacts and deals | Send WhatsApp follow-ups directly from a contact or deal page. |
| Campaigns | Send approved WhatsApp templates to selected contact segments. |
| Workflows | Trigger automated WhatsApp messages on lead creation, stage change, or inactivity. |
| AI Agents | Attach an agent to auto-reply to inbound messages based on conversation flows. |
| Reports | Monitor sent/received counts, active conversations, and agent activity. |
Connect a WhatsApp Number
Go to Automation → Integrations, open the Social Media tab, and select WhatsApp. If no numbers are connected yet you'll see the empty state below.
Click + Connect number to open the 5-step setup wizard.

Step 1 — Basic Configuration
Fill in the three required fields:
| Field | What to enter |
|---|---|
| Account Name | A label for this number inside Brixi — use your brand name or the team that owns this number. |
| WhatsApp Provider | Select Meta Cloud API from the dropdown. |
| Phone Number | The verified WhatsApp Business number including country code. |
Click Continue when all three fields are filled.
The account name is only visible inside Brixi. Use something descriptive like "Sales Team – Mumbai" if you plan to connect multiple numbers.
Step 2 — Lead Generation Settings
Configure whether inbound WhatsApp messages should automatically create leads in Brixi.
| Setting | What it does |
|---|---|
| Enable lead generation (toggle) | When on, every new WhatsApp conversation from an unknown contact creates a lead automatically. |
| Lead Source Name | The source label applied to contacts created from this channel — for example WhatsApp or WhatsApp Inbound. |
Turn on Enable lead generation and set the source name, then click Create account.
If you leave lead generation off, inbound messages will still appear in the Inbox but will not automatically create new contacts.
Step 3 — Credentials
Enter your Meta Cloud API credentials. These connect Brixi to your Meta App so it can send and receive messages on behalf of your WhatsApp number.
| Field | Where to find it |
|---|---|
| WhatsApp Business Account ID | Meta Business Manager → Business Settings → WhatsApp Accounts |
| Phone Number ID | Meta Developer Console → Your App → WhatsApp → API Setup |
| API Key (Access Token) | Meta Developer Console → Your App → Generate a permanent system user token |
Paste each value into the corresponding field and click Authenticate.
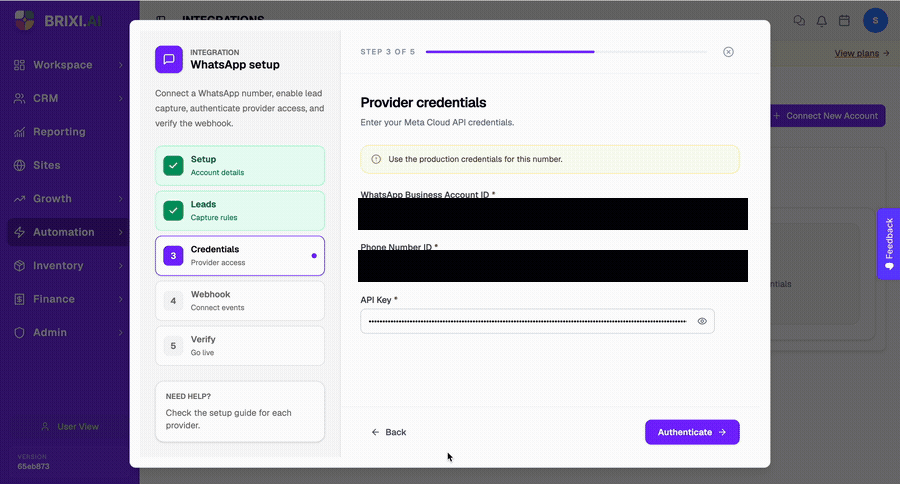
Use a permanent access token from a System User, not a temporary user token. Temporary tokens expire and will break your connection.
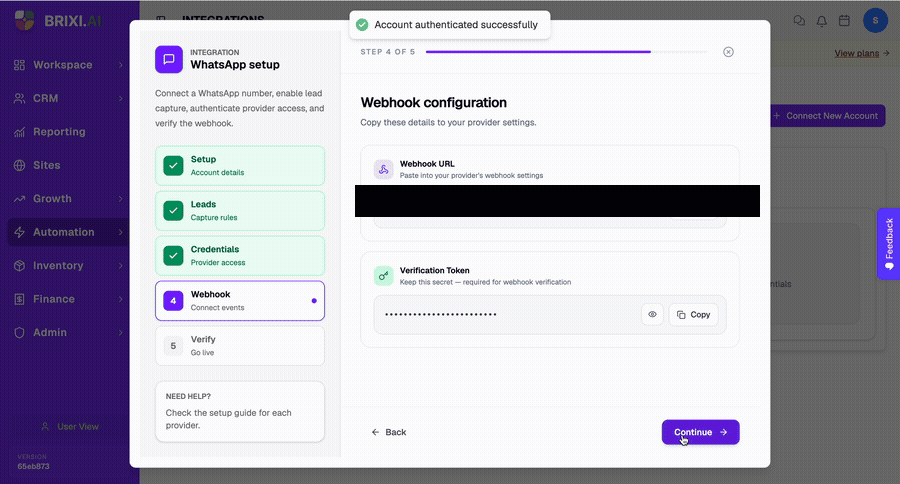
Step 4 — Webhook
Brixi generates a unique webhook URL and verify token for your account. You need to paste these into your Meta App to allow Meta to send message events to Brixi.
In Brixi: Copy the Webhook URL shown on this step.
In Meta Developer Console:
- Open your app and go to WhatsApp → Configuration.
- Under Webhook, click Edit.
- Paste the Brixi webhook URL into Callback URL.
- Paste the verify token (shown below the URL in Brixi) into Verify Token.
- Click Verify and Save.
- Subscribe to the following webhook fields:
messages,message_deliveries,message_reads.
Return to Brixi and click Continue.
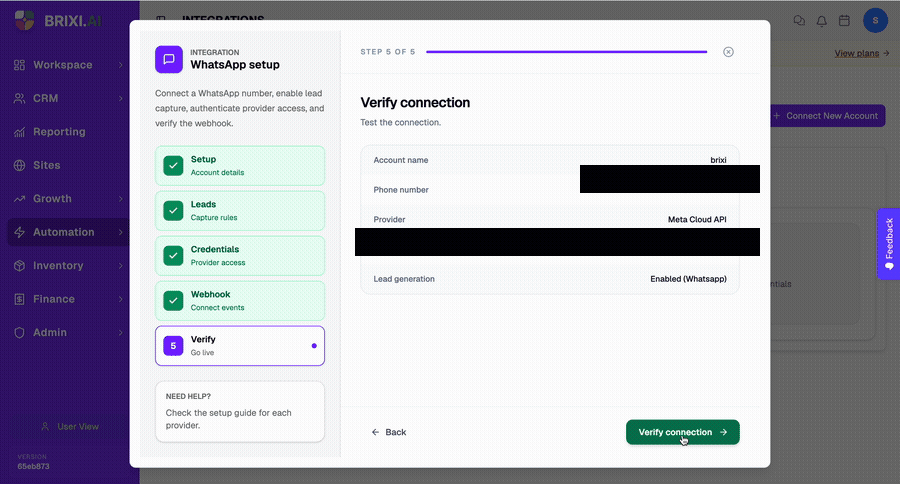
Step 5 — Verify and Go Live
Brixi confirms your setup by showing a summary of all configured values. Review the details, then click Verify connection to test that the webhook is receiving events correctly.
- If verification passes, the wizard shows a success state and setup completes.
- If it fails, check that you subscribed to the correct webhook fields in Meta and that the access token has the required permissions (
whatsapp_business_messaging,whatsapp_business_management).
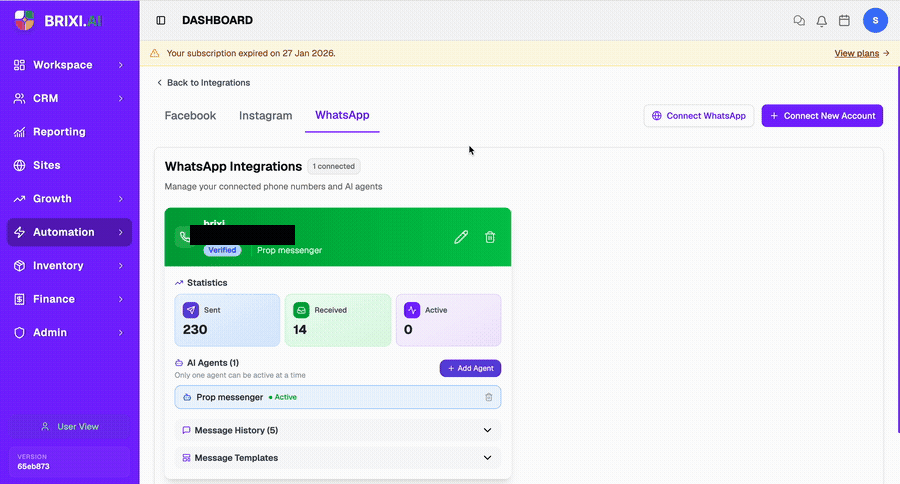
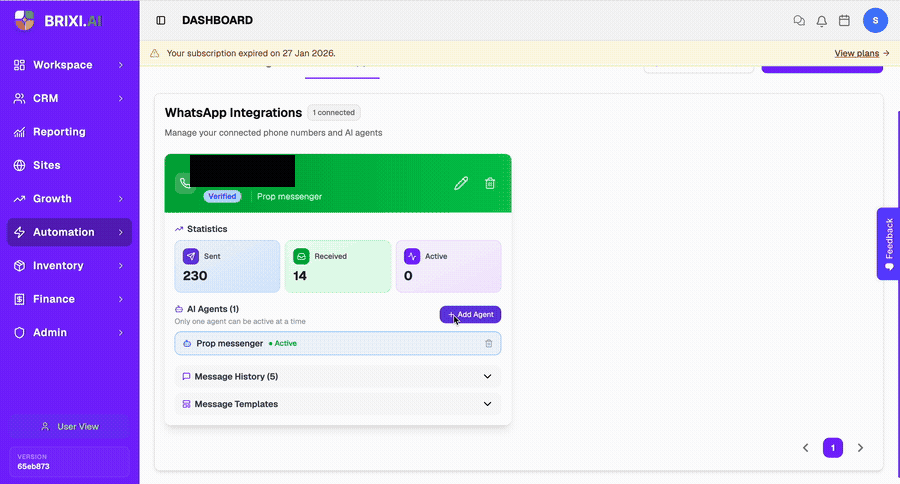
After Connecting
Once connected, the WhatsApp Integrations page shows your number as a card with:
- Number and account name — the verified number and the label you set in Step 1.
- Verified badge — confirms the webhook is active.
- Statistics — sent, received, and active conversation counts.
- AI Agents — agents attached to this number.
- Message History — recent message activity.
- Message Templates — approved templates available for campaigns and workflows.
WhatsApp Message Sync to the CRM
Once a number is connected and verified, Brixi keeps every WhatsApp conversation in sync with your CRM automatically. Inbound and outbound messages are captured against the right contact, so the conversation thread, the contact record, and your reports all agree — no copy-pasting from your phone.
What Syncs Automatically
Sync covers any message that passes through the connected number — in both directions.
| What | How it syncs |
|---|---|
| Inbound messages | Captured the moment Meta delivers the messages webhook event, then routed to the matching contact's conversation. |
| Outbound messages | Replies you send from the Inbox — and WhatsApp follow-ups sent from a contact or deal page — are written back to the same thread. |
| Delivery & read status | Sent / delivered / read ticks update from the message_deliveries and message_reads events you subscribed to in Step 4. |
| Statistics | The sent, received, and active-conversation counts on the number card update as messages flow. |
Only messages sent and received through the connected number sync automatically. A chat held on someone's personal phone or another device won't appear — record those manually with Log Message (see Logging a Message Manually).
How a Message Is Matched to a Contact
When a message arrives, Brixi matches the sender's phone number against your CRM and routes the conversation accordingly:
| Sender | What Brixi does |
|---|---|
| Known number | Links the message to the existing contact. It appears in that contact's thread and on the contact's Messages timeline. |
| Unknown number — lead generation on | Creates a new lead automatically using the Lead Source Name from Step 2, then links the conversation to it. |
| Unknown number — lead generation off | Shows the message in the Inbox as a placeholder conversation, but creates no contact. Convert it yourself with Create a Lead, or attach it to a record with Link. |
For the manual lead/link flow, see Create a Lead from a New Conversation.
Matching is by phone number. If a known customer messages from a second number you don't have on file, use Link instead of Create a Lead so you don't create a duplicate contact. Make sure saved numbers include the country code — a mismatch there is the usual reason a message lands as a new lead instead of on the existing contact.
Where Synced Messages Appear
| Location | What you see |
|---|---|
| Omnichannel Inbox | The live two-way thread, under both the Contacts and WhatsApp tabs, with the contact's CRM record in the right pane. See Omnichannel Inbox. |
| Contact → Activity Timeline → Messages | WhatsApp messages logged against the contact, alongside SMS and other chats. See Contact Detail → Activity Timeline. |
| Reports | Aggregate sent / received counts and active-conversation totals for the number. |
Logging a Message Manually
When an exchange happens off the connected number — a teammate replied from their own phone, or the customer reached you on a different device — sync won't capture it. Log it against the contact so the timeline stays complete:
- Open the contact and select Actions → Log Message.
- Set Direction to Sent or Received and App to WhatsApp.
- Enter the date, time, and message text, then Log message.
See Log a Message for the full dialog.
Meta's WhatsApp rules only allow free-form replies within 24 hours of the customer's last message. Outside that window, you can only send an approved template — use the templates on the number card (see After Connecting) to re-engage. A free-form reply sent late may be rejected by Meta and won't appear as delivered.
Add an AI Agent to a WhatsApp Number
An AI agent can automatically reply to inbound WhatsApp messages based on a conversation flow you configure in Automation → AI Assistants → Agents.
To attach an agent:
- Go to Automation → Integrations → WhatsApp.
- Open the connected number card.
- Scroll to AI Agents.
- Click + Add Agent.
- Select the agent from the list.
- Click Link Agent to confirm the assignment.
Only one agent can be active on a number at a time. The active agent handles all inbound messages until it is removed or replaced.
You must build the agent in Automation → AI Assistants → Agents before you can attach it here. The agent must have an active conversation flow published.
Remove an AI Agent from a WhatsApp Number
- Go to Automation → Integrations → WhatsApp.
- Open the connected number card.
- Scroll to AI Agents.
- Click the trash icon next to the active agent.
- Confirm the removal.
After removal, inbound messages will no longer receive automated replies. Conversations already in progress remain in the Inbox for manual follow-up.
Common Issues
| Issue | What to check |
|---|---|
| Webhook verification fails | Confirm you pasted the exact Brixi webhook URL and verify token into Meta. Check that the access token has whatsapp_business_messaging permission. |
| Number shows as unverified after setup | The webhook may not be receiving events. Re-open the number settings and re-run the verification step. |
| Messages are received in Meta but not appearing in Brixi | Check that you subscribed to the messages webhook field in your Meta App. |
| Lead is not created for an inbound message | Confirm lead generation is enabled in Step 2 settings. Open the number card and check the lead generation toggle. |
| Inbound message lands as a new lead instead of on the existing contact | The sender's number didn't match. Check the saved contact number includes the country code, then merge the duplicate or use Link on the placeholder conversation. |
| Delivery or read ticks don't update | Confirm you subscribed to the message_deliveries and message_reads webhook fields in your Meta App. |
| Outbound reply won't send | The 24-hour window has passed since the customer's last message. Send an approved template instead of a free-form reply. |
| Agent is not replying to inbound messages | Confirm the agent status is Active in the AI Agents section. Check the agent's conversation flow is published in Automation → AI Assistants → Agents. |
| Access token expired | Replace the temporary token with a permanent system user token in Meta Developer Console, then re-enter it in the Credentials step. |
| Wrong number connected | Remove the number from Brixi and go through the 5-step setup again with the correct number and credentials. |
The two things that break this setup are the webhook handshake (Step 4) and an expiring access token — both live in Meta Developer Console, so re-check those before raising anything. If you can't see the WhatsApp setup in Brixi at all, that's by design: only account admins can connect numbers, so ask your admin.
Contact Brixi support before a large go-live if you're unsure about webhook configuration or credential permissions, or if verification keeps failing after the Meta-side checks. Share the WhatsApp number (without the full digits if preferred), your Meta App ID, and the step where the setup fails.